Importing data
In this section, we will explain how you can import data by integrating with external services such as crypto exchanges.
Adding an exchange
You can integrate many different exchanges with rotki. Currently supported exchanges are:
- Kraken
- Poloniex
- Binance
- Bitmex
- Coinbase
- Coinbase Pro
- Gemini
- Bitstamp
- Binance US
- Bitfinex
- Bitcoin.de
- Iconomi
- KuCoin
- Independent Reserve
- Bitpanda
- OKX
- Woo
- Bybit
- HTX
To do so, you need to go to your exchange and create an API key (see the section API key permissions).
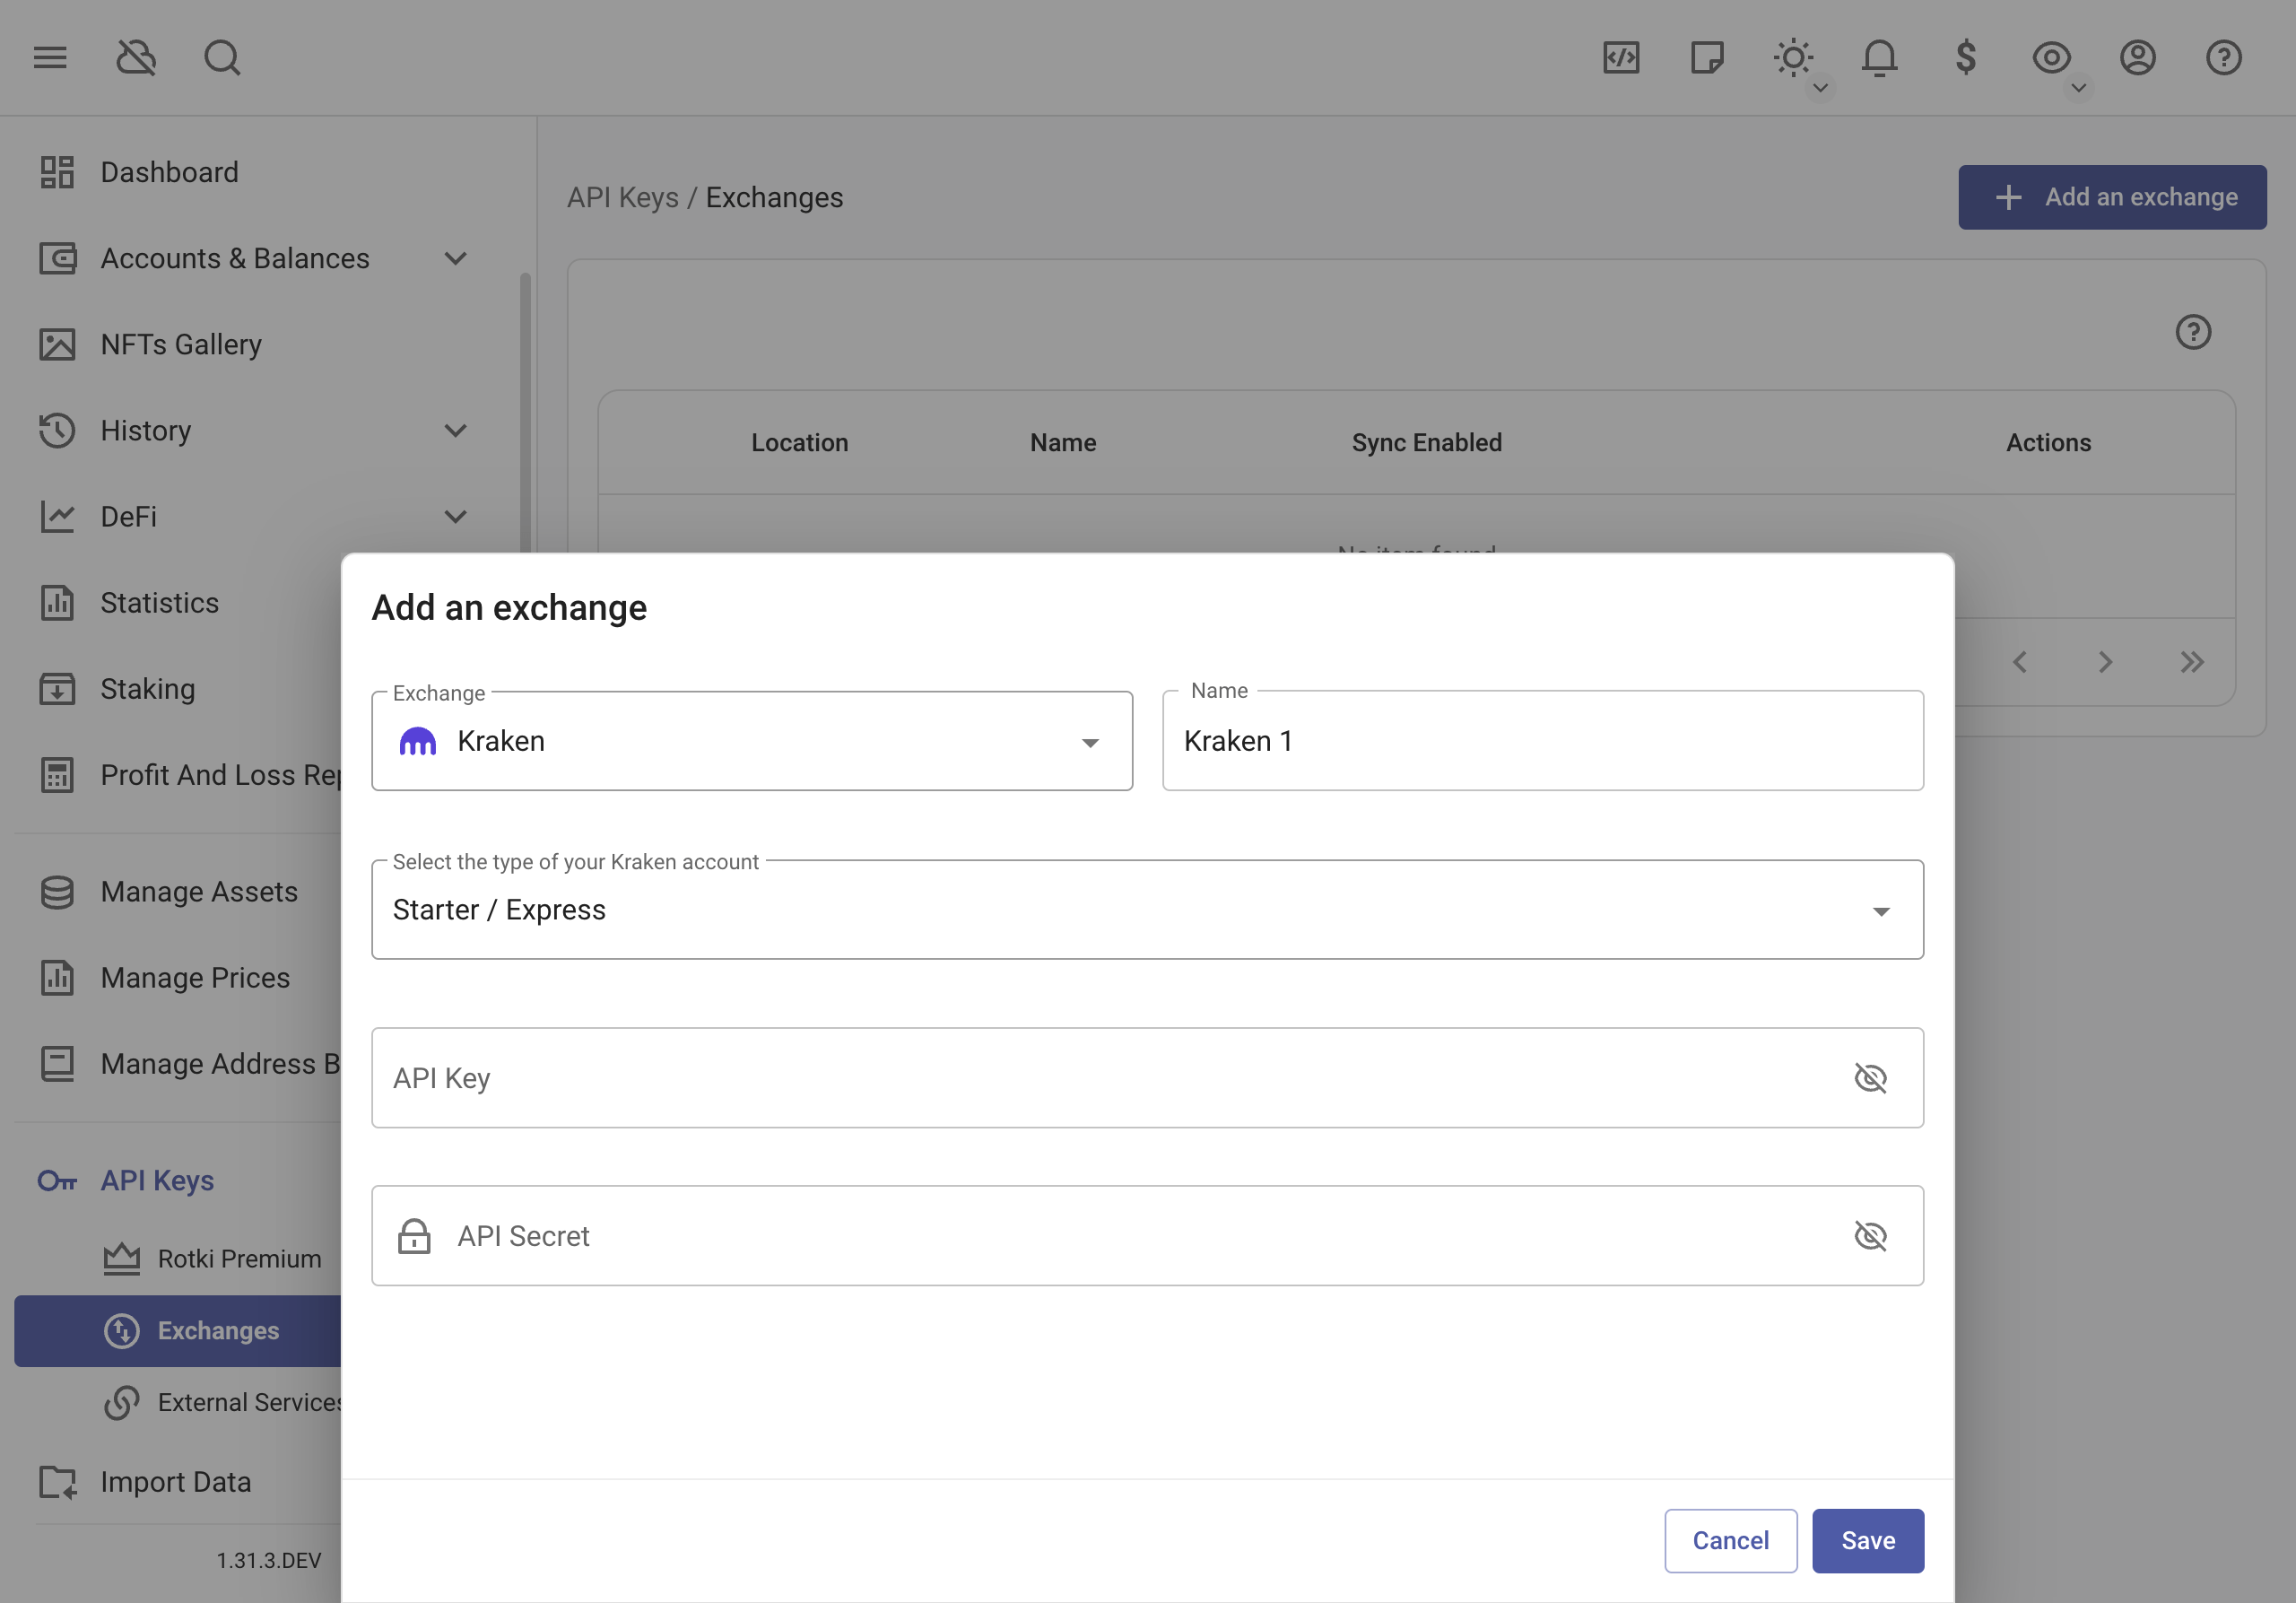
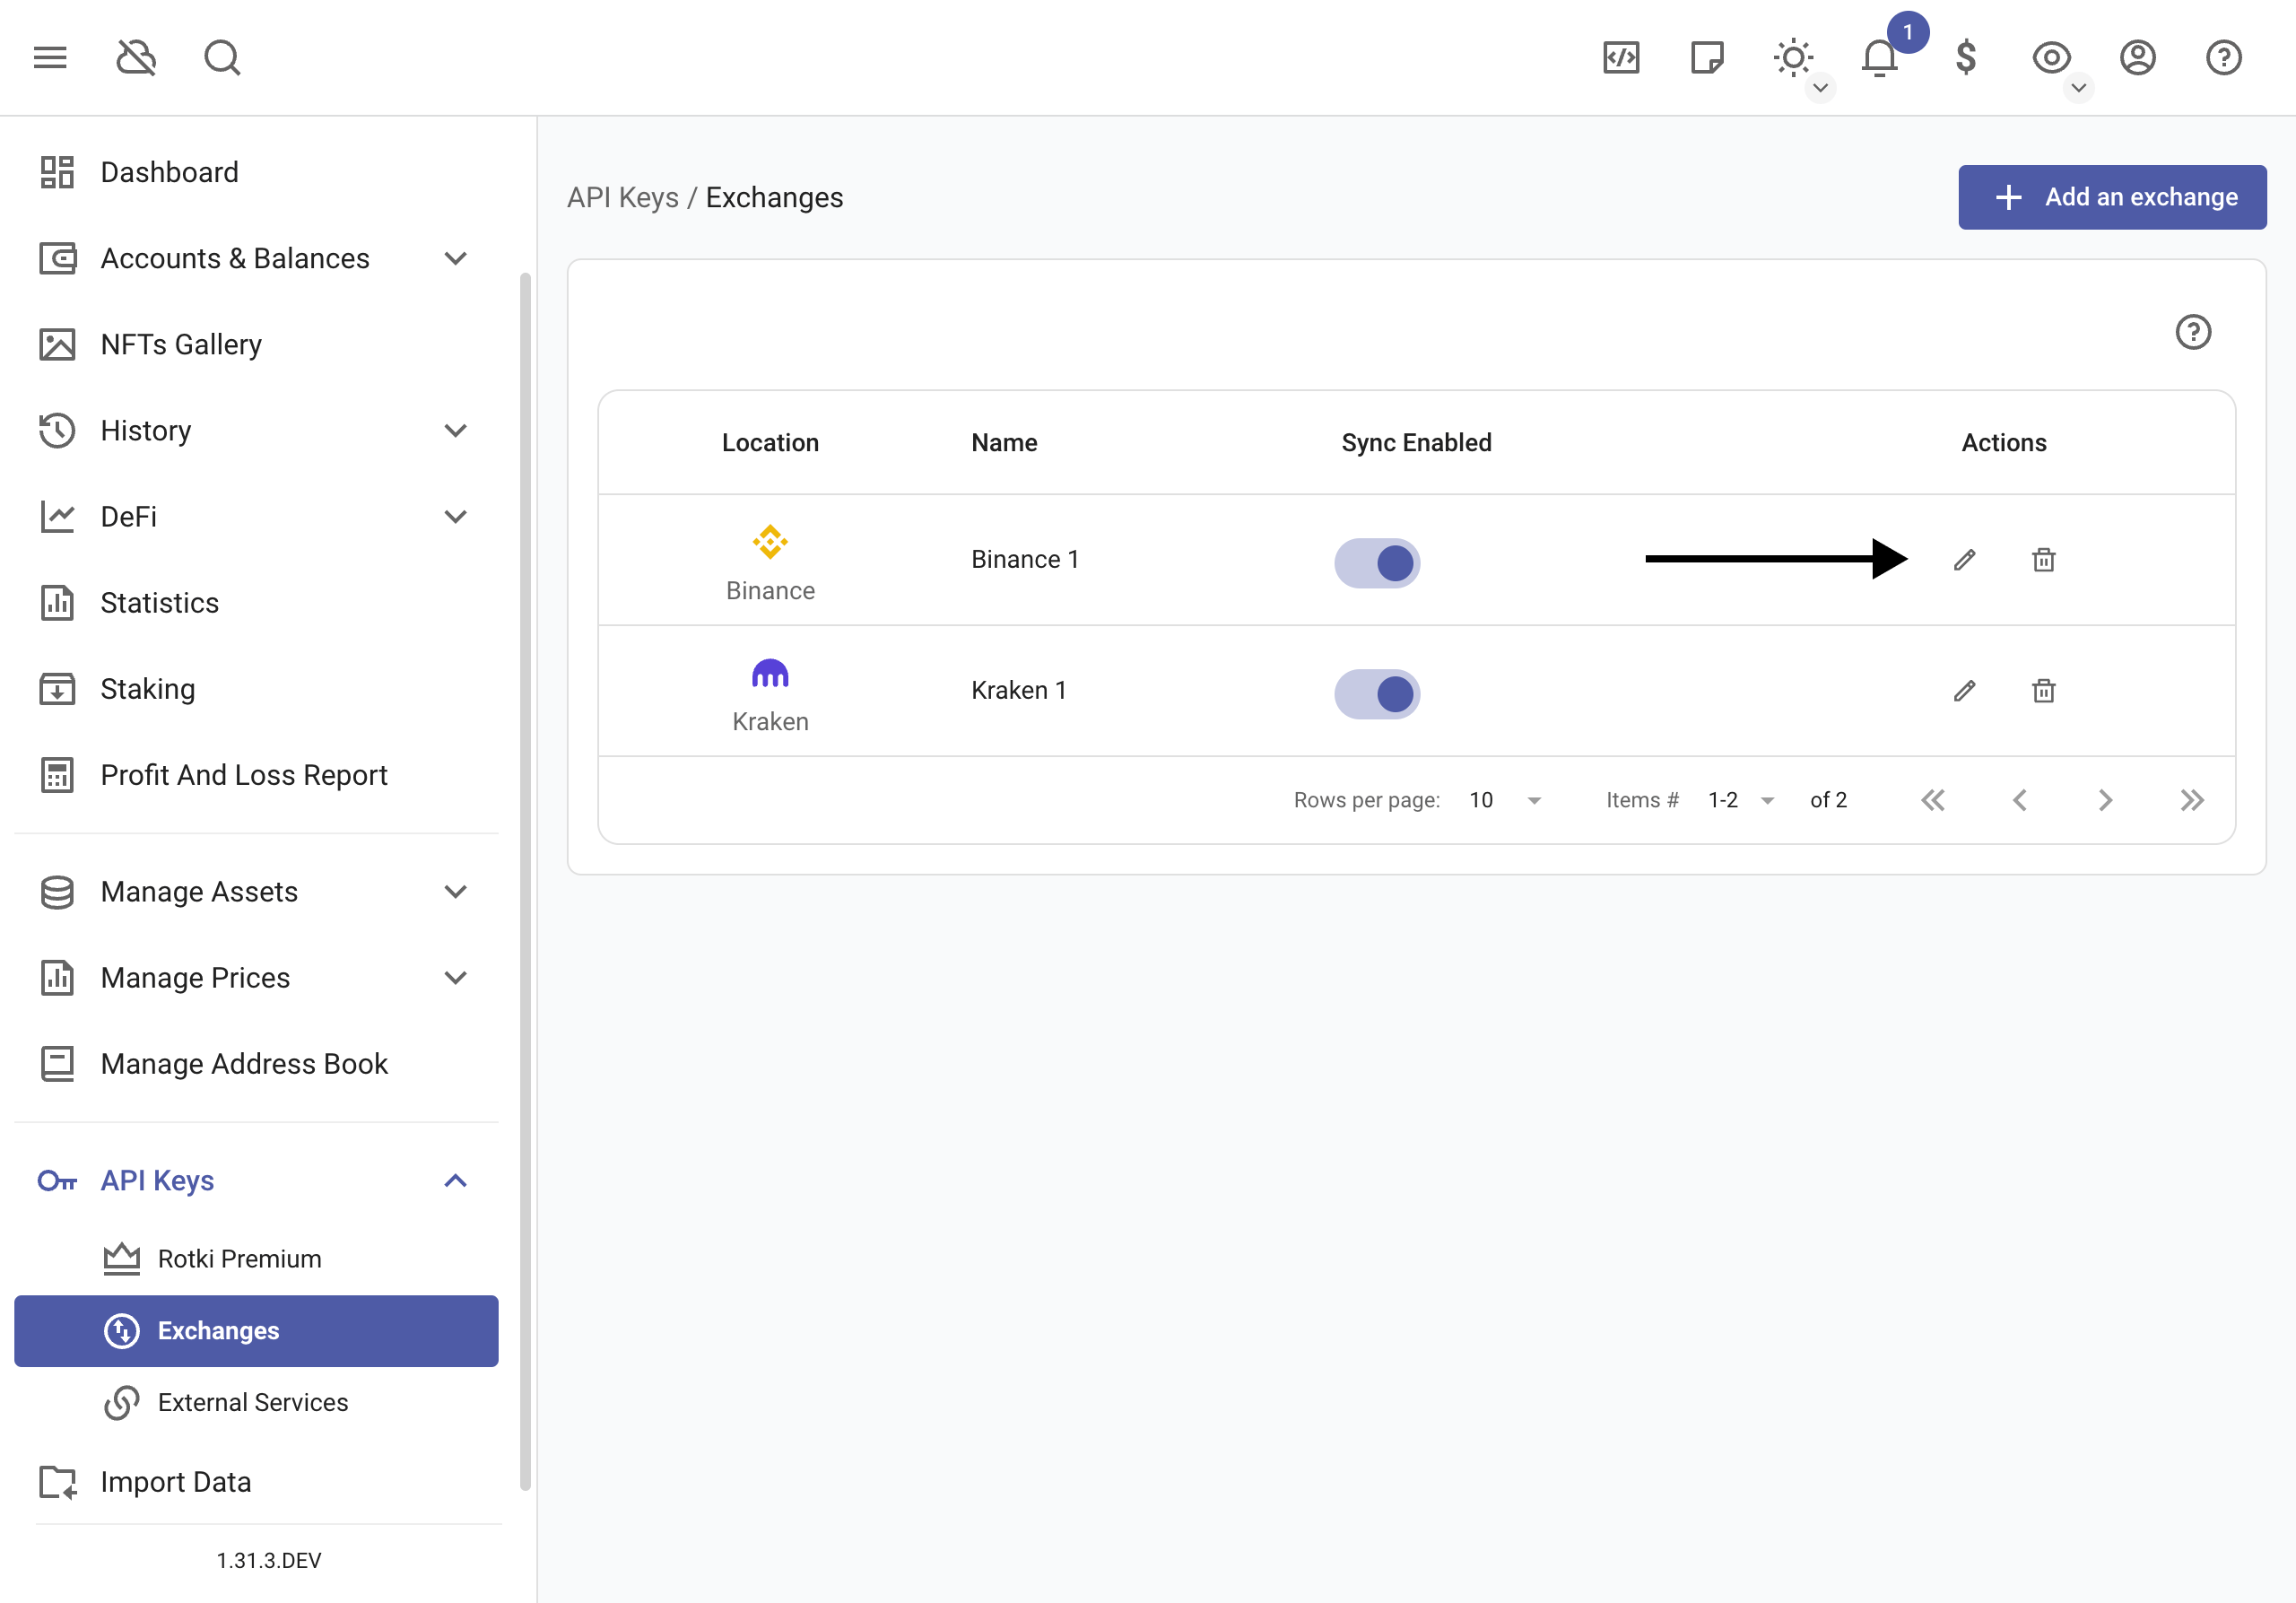
Click on the API Keys > Exchanges on the left sidebar. This will take you to the place where you can add new exchange API keys. Press the plus button to open the exchange addition menu.
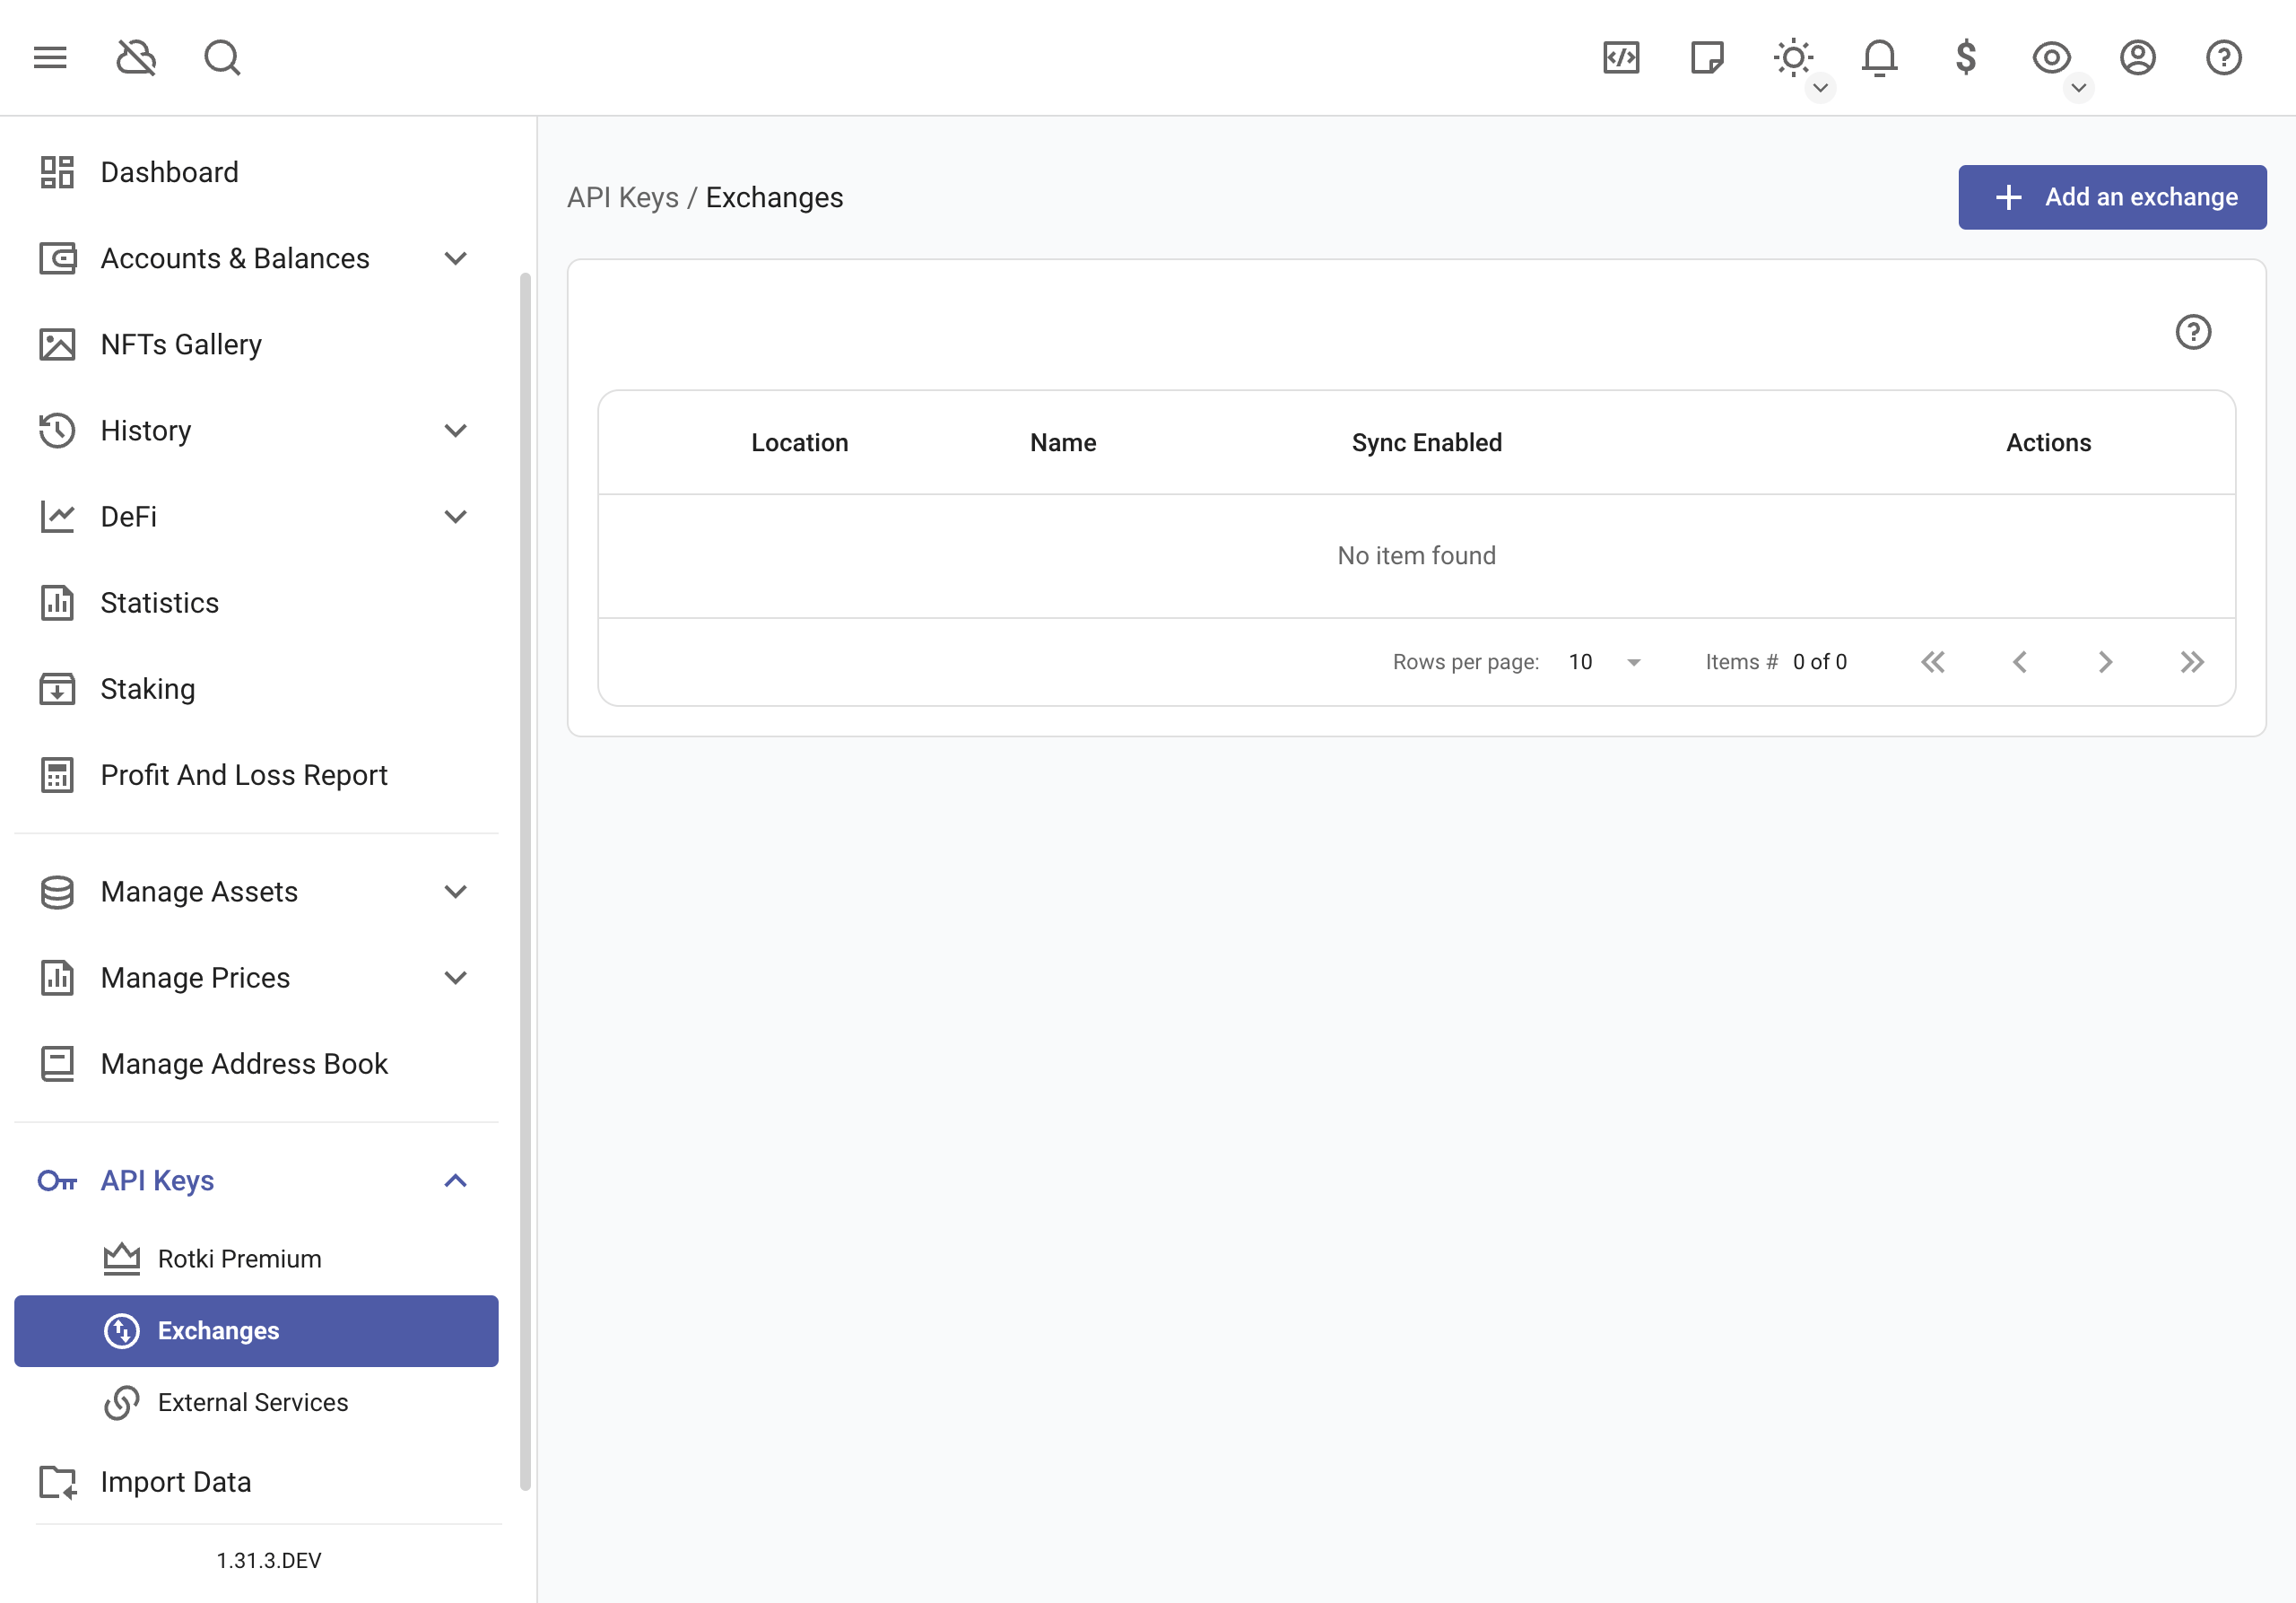
Then copy and paste the API Key and the API Secret in the respective text fields and press Save.
If all went well, you should be able to see your newly added exchange. If not, please double-check that the key and secret are correct.
You also have the option to enable/disable synchronization for the connected exchanges. Usually, you may want to disable synchronization to prevent your IP from getting banned due to too many syncs.
Note: At the moment, margin trades and future trades are not yet supported in rotki.
API key permissions
rotki only needs read-only permissions for your accounts. As a general rule, exchanges (e.g., Binance, Coinbase Pro) group all the read-only permissions as "read" or "view".
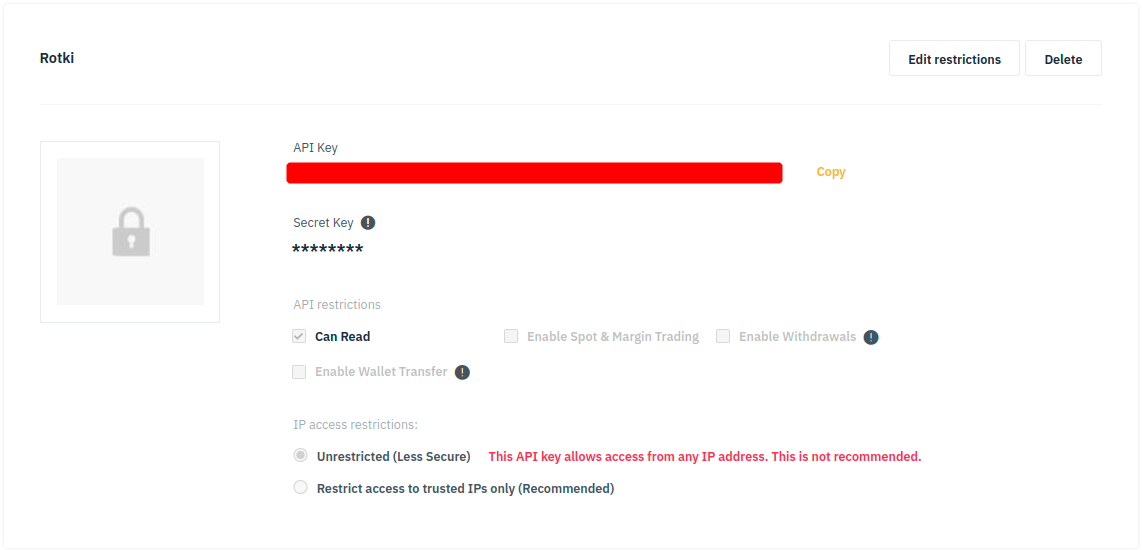
In the case of an exchange providing a more granular permissions scheme (e.g., Coinbase, Kraken) or having additional options (e.g., query limits, passphrase), refer to the exchange documentation or get in touch via their customer support channel.

You may also try creating an API key with the minimum read-related permissions, then adding it in rotki and finally checking that the connection was successful and data was loaded as expected. Otherwise, try again adding more read-related permissions.
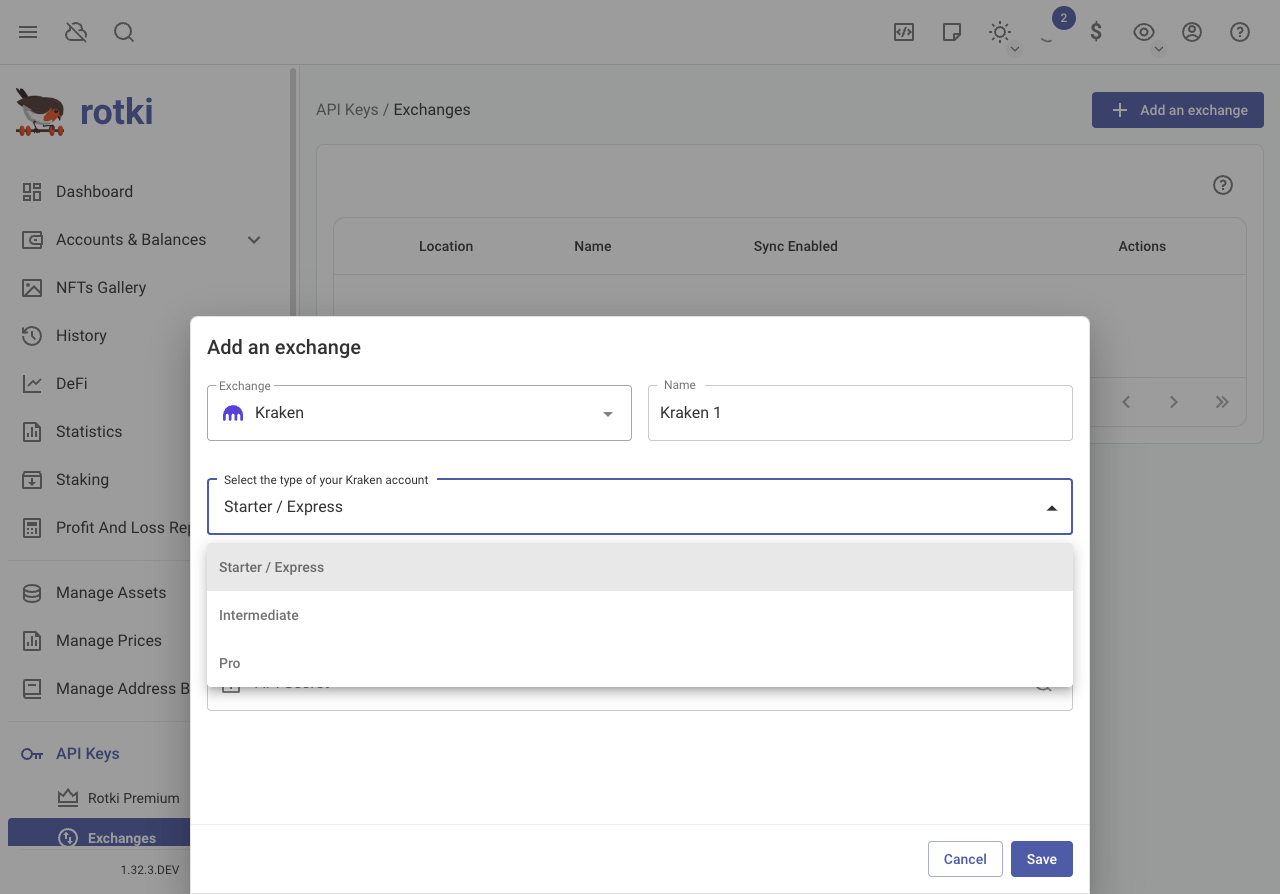
Kraken
When inputting the API key for Kraken, you need to specify the type of your Kraken account, which depends on your Kraken account verification level. Refer to this for more information.
Binance / Binance US
To improve the speed of querying trade information using the Binance API, you can specify which market pairs to query instead of querying all possible pairs. This reduces the number of requests made to Binance servers, avoiding potential rate limits and failures. To select specific markets, edit your Binance exchange instance configuration.
And choose the markets in the Filter market pair(s) search.
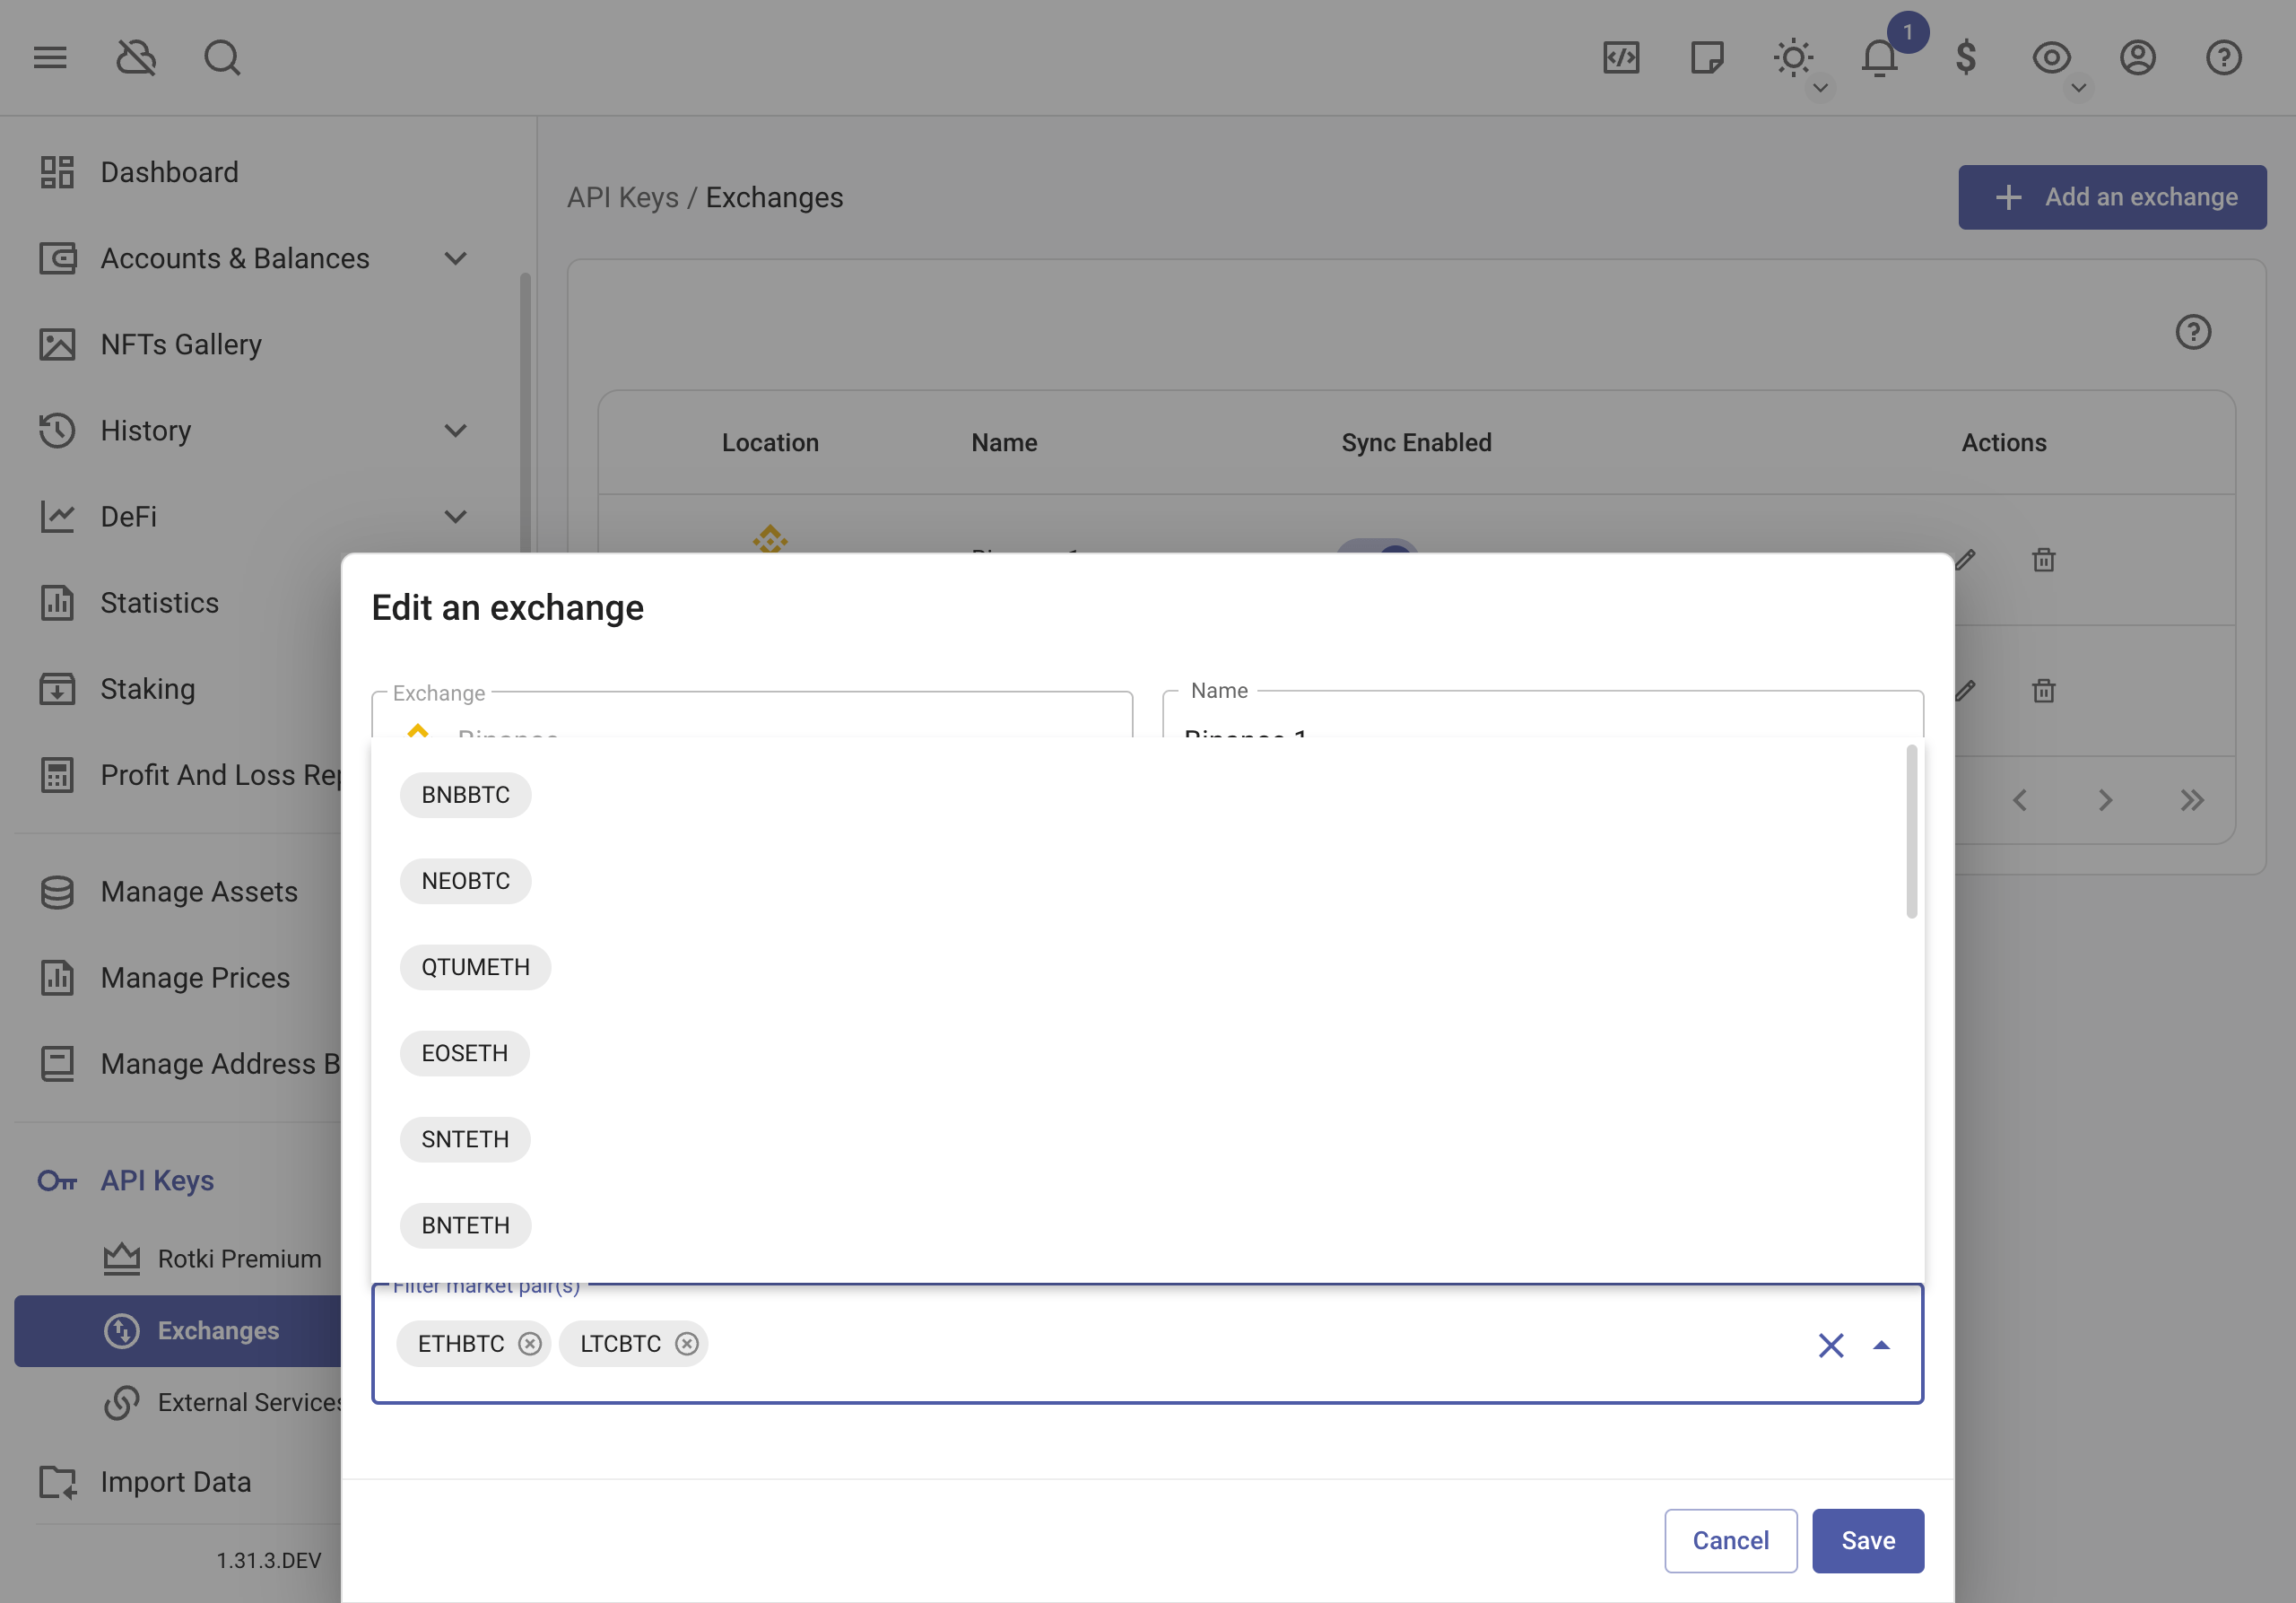
Once finished, click on save.
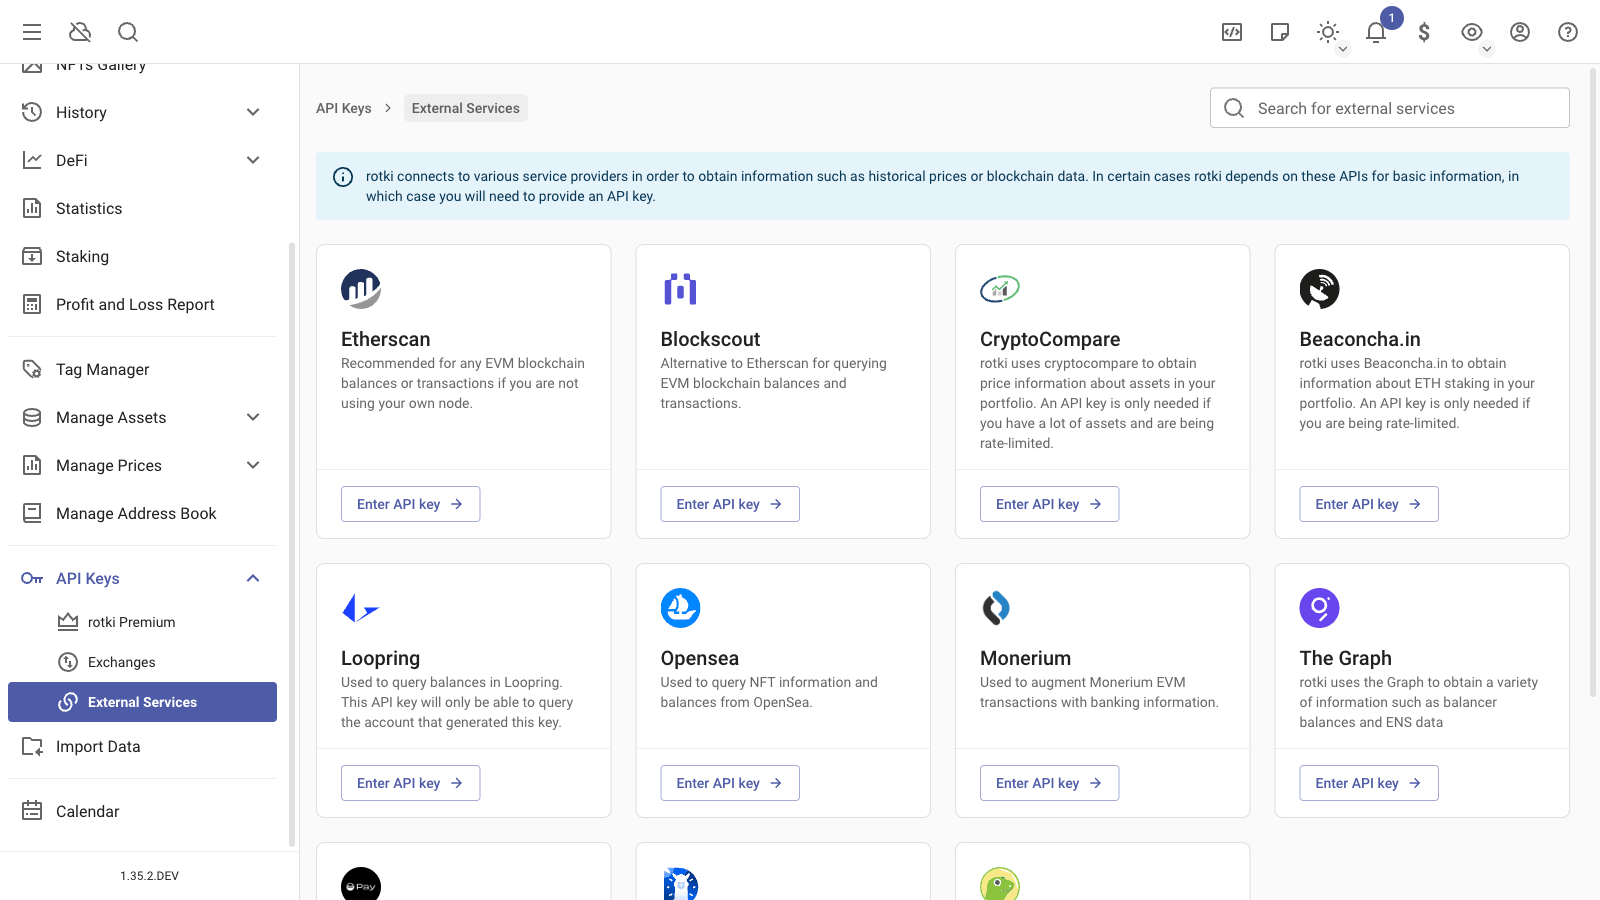
External services
rotki relies on various external services for data such as historical crypto prices or EVM transactions. To get that data, some of these services require API keys. So you should go to their webpage, create a free account, and generate an API key. Once this is done, you can enter the API key in the section of the API keys page.
Go to API Keys → External Services.
Etherscan
At the moment, there is no compulsory API key. But if you don't use your own node, Etherscan queries without an API key are really slow. So if you don't already have an account with them, please create one here and then generate a free API key and set it in the app as explained above. It's free of charge.
Loopring balances
To have your Loopring balances detected, you will need an API Key from Loopring. To get one, visit Loopring Security and unlock your account. In the list of options, click on Export Account.
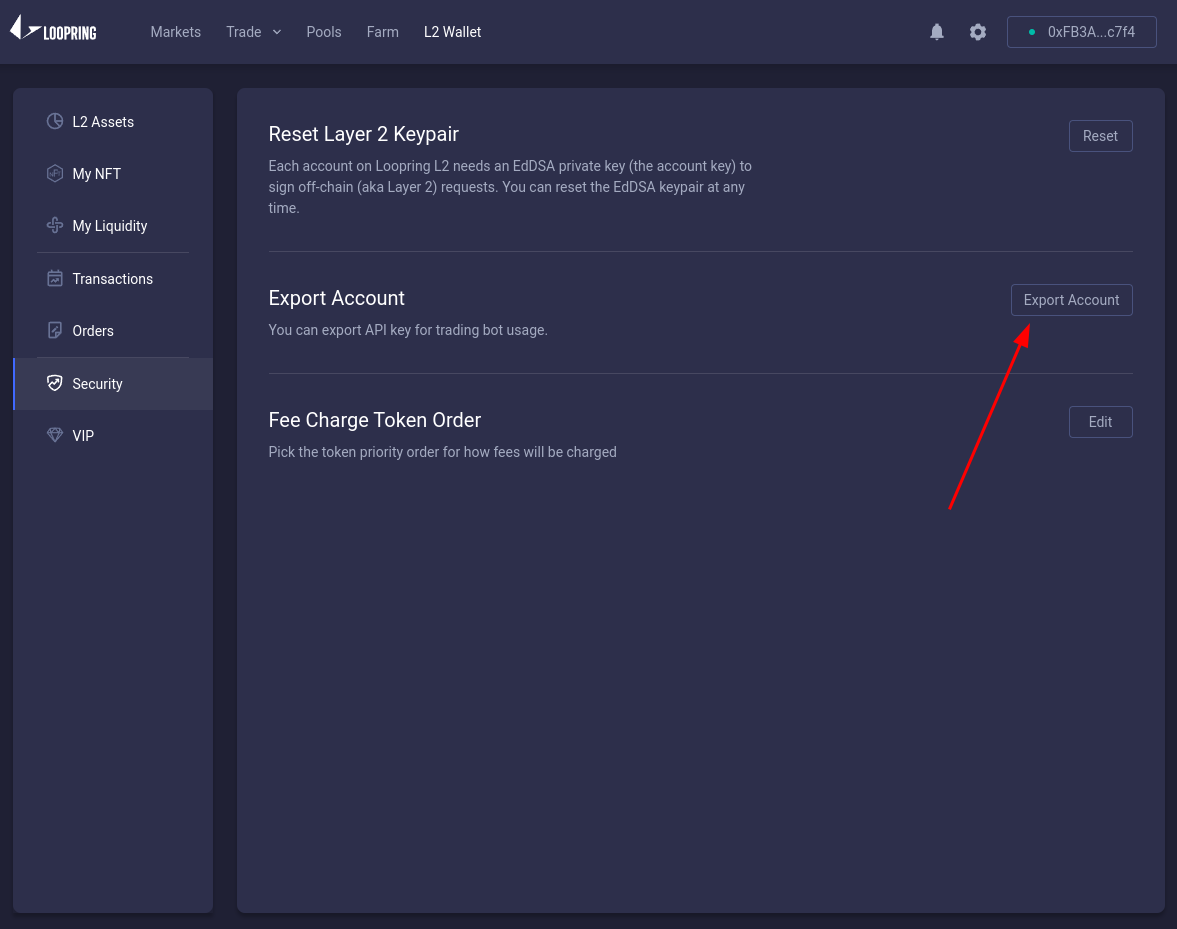
Then in rotki, you need to add the API key in the Loopring section.
After following these steps, your balances in the dashboard will be updated including the Loopring information.
Monerium
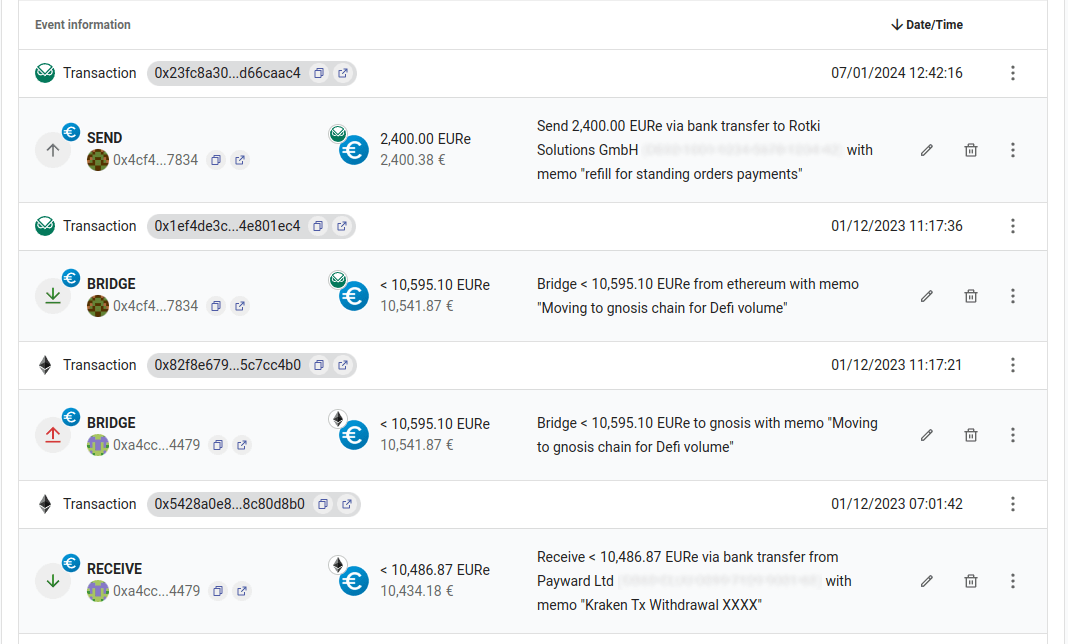
As long as you provide Monerium credentials, all Monerium transactions on Mainnet, Polygon, and Gnosis chain will be decorated with bank data (or chain bridging data), which you can also see in the Monerium app.
- For bank transfers from/to your address, you will be able to see the destination/source IBAN along with the memo of the transfer.
- For automatic EURe bridging between EVM chains, you will see amounts, from/to EVM chains along with from/to address.
Note: Monerium API can only use basic authentication at the moment. We are in contact with their team and they will add API keys eventually. But for now, they only have basic authentication, which means your username and password are stored in rotki (encrypted). Take necessary security precautions and don't use unless you understand the potential risks.
Gnosis Pay
You can integrate Gnosis Pay with rotki to import your transaction data. Note that this feature is experimental and is only available for premium users.
Adding Gnosis Pay Session Token
To add your Gnosis Pay session token:
Login to Gnosis Pay:
- Go to Gnosis Pay and log in to your account.
Retrieve the Session Token:
- Open your browser's developer tools (right-click on the page and select
Inspector pressF12/Ctrl+Shift+I/Cmd+Option+I). - Go to the Application tab in the developer tools.
- In the Storage section on the left sidebar, click on Cookies and select
https://app.gnosispay.com(marked as 1 in the image). - Look for the cookie named
__Secure-authjs.session-tokenin the list (marked as 2 in the image). - Copy the value of the cookie from the Cookie Value section at the bottom (marked as 3 in the image).
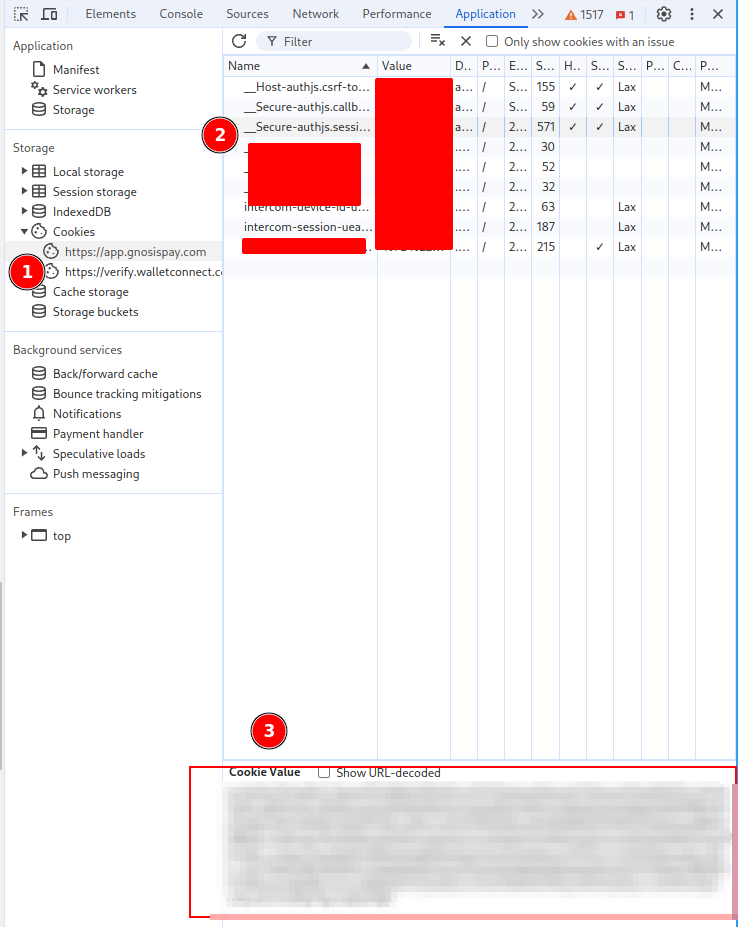
- Open your browser's developer tools (right-click on the page and select
Add Session Token to rotki:
- In rotki, navigate to
API Keys → External Services. - Scroll to the Gnosis Pay section.
- Paste the session token into the Session Token field.
- Click Save.
- In rotki, navigate to
Note: The session token only provides read-only access to your Gnosis Pay data
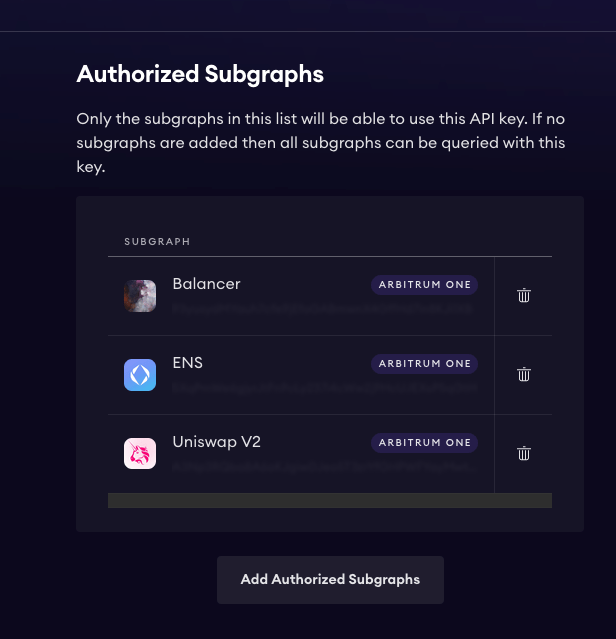
The Graph
rotki uses The Graph to obtain Balancer balances and particular ENS data. You can create one here.
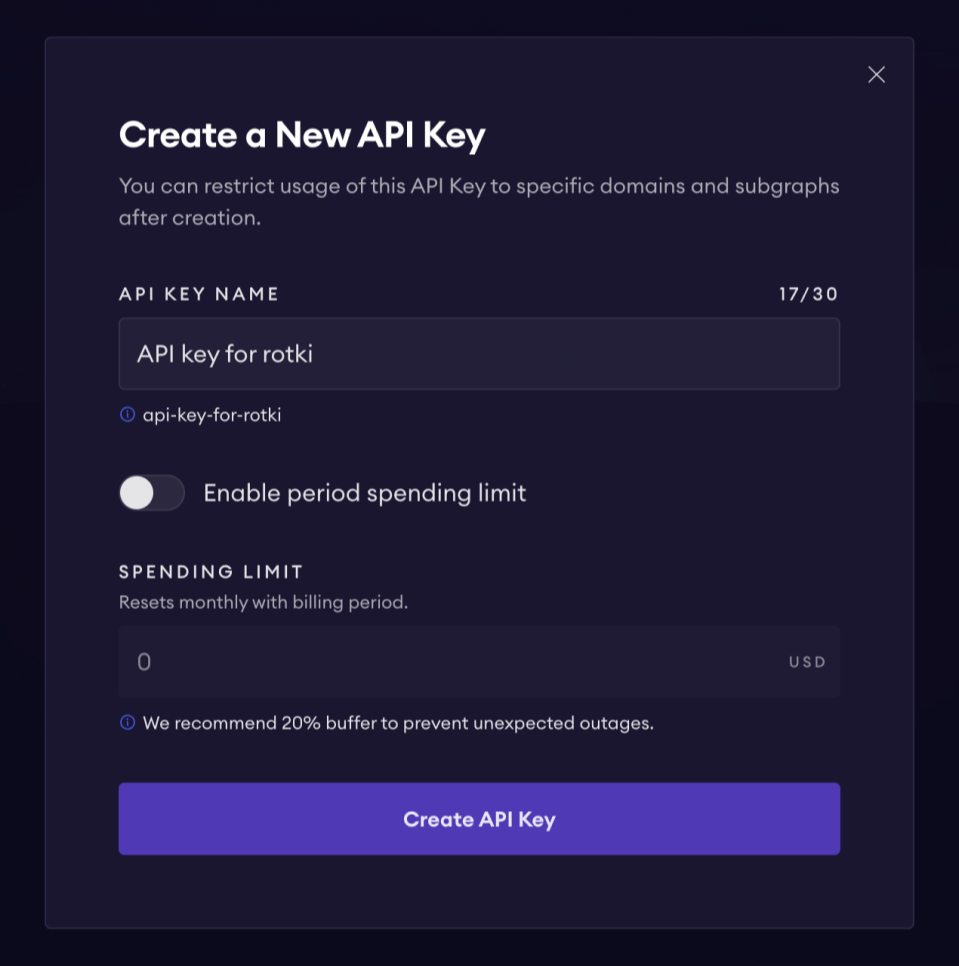
After creating the API key, you can add it to rotki. Additionally, ensure that the generated API key is authorized for the Balancer and ENS subgraphs.
DefiLlama
rotki integrates with DefiLlama for price data. An API key is not required, but a paid API key will provide higher rate limits. You can find more information about their API here.
CoinGecko
rotki uses CoinGecko for cryptocurrency data. An API key is not required, but a paid API key will provide higher rate limits. You can find more information about their API here.
Import exchange data (CSV)
For exchanges that don't support integration through API keys (or haven't integrated to rotki), you can still import your trades or transactions. First, export the CSV file from the exchange's user interface. Then, import this CSV file into rotki.
Go to Import Data.

You can only use a CSV file here. Additionally, the time format in the CSV might differ from what rotki expects. To address this, enable the Use custom date format to parse your file setting before clicking Import. Then, specify the time format used in the CSV file.
For each data source click on "Import Data" on the left sidebar and then following the instructions.
Cointracking.info
rotki can import any trade CSV data exported from cointracking.info. But in general, it's not recommended to utilize cointracking as their exported data are missing a lot of information.
Binance.com
rotki can import a CSV data file exported from binance.com. But due to Binance's CSV format, some data may not be importable. You will see warnings if this happens.
By importing a CSV file, you can import more than with the API. Particularly: Trades, Deposits and Withdrawals, Small assets exchange BNB, ETH 2.0 Staking and ETH 2.0 Staking Rewards, Launchpool Interests, POS savings interest, POS savings purchase, POS savings redemption.
BitMEX.com
rotki can import a CSV data file exported from BitMex. You may see warnings if data can't be imported. If this happens, please reach out to us on Discord or open an issue on GitHub.
Bitstamp.net
rotki can import a CSV data file exported from Bitstamp. You may see warnings if data can't be imported. If this happens, please reach out to us on Discord or open an issue on GitHub.
Bittrex
Bittrex is a now bankrupt exchange and as such you probably can use this only if you had exported the files while it was running.
rotki can import trades, deposit/withdrawals from the different bittrex CSVs.
Bisq
You can import data from Bisq into rotki. All trades from Bisq can be picked up by the given CSV.
Block.fi
BlockFi is a now bankrupt exchange and as such you probably can use this only if you had exported the files while it was running.
rotki can import two different CSV files from BlockFi. One for the trades and one for all other transactions.
Blockpit
rotki can import trades and other activity data from Blockpit's CSV files.
Bitcoin.tax
You can import trades, income and spending CSV files from Bitcoin.tax.
Crypto.com mobile
You can import data from crypto.com mobile app into rotki. Note that this concerns only the Crypto.com mobile application. If you want to connect your Crypto.com Exchange account, please wait until we support it and then connect to it as an exchange.
Kucoin
rotki can import the trades CSV file from Kucoin.
Nexo
rotki can import the transactions CSV file from Nexo.
ShapeShift.com
You can import trade CSV data file exported from ShapeShift. Transactions will come from adding your Blockchain Accounts used with ShapeShift to rotki.
Import data in the same section as the image above in the prior heading. When exporting trades from ShapeShift, the selected wallet may show DEX trades in the user interface. If it is not the Native wallet, DEX trades may not show up in the user interface, but they still export to CSV. This importer ignores DEX trades, as they are covered by premium support for Uniswap and SushiSwap.
Uphold.com
You can import transaction history CSV data exported from the Uphold activity page. Transactions will be created when the row's origin currency and destination currency are the same. Trades will be created if the currencies differ and a rate will be determined automatically.
rotki Generic Import
You can import data (trades & events) from exchanges not supported by rotki by clicking "Import Data" on the left sidebar, selecting "Custom Import" and following the prompt. This involves the user converting the source (a not directly supported exchange, protocol, etc.) data to match the import format of rotki.
Note: Keep in mind that all assets that you enter are identified by their asset identifier and not the symbol, as symbols are not unique. The identifier differs per asset and at the moment for ERC20 tokens follows the CAIP-19 format, and for others, it's just the asset symbol or a random string for manually input tokens.
For the CAIP-19 format, it's essentially calculated by knowing the chain ID and the address of your token. So for mainnet (chain ID 1) and USDT (0xdAC17F958D2ee523a2206206994597C13D831ec7), it's eip155:1/erc20:0xdAC17F958D2ee523a2206206994597C13D831ec7.
You can easily find the identifier of each asset by going to Manage Assets > Assets section and copying the identifier of the asset in question.
The import is split into two types:
rotki Generic Trades Import
This is solely for importing generic trades. The expected file format is CSV with the following headers and descriptions as a guide:
- Location: This is the source of the data. It should be one of rotki's supported locations. If it is not supported, use
"external". - Base Currency: The currency bought in a
"Buy"and sold in a"Sell". e.g., BTC/ETH where BTC is the base currency. - Quote Currency: The currency sold in a
"Buy"and bought in a"Sell", e.g., BTC/ETH where ETH is the quote currency. - Type: The type of trade made. It can either be a
"Buy"or a"Sell". - Buy Amount: The amount of the currency bought.
- Sell Amount: The amount of the currency sold.
- Fee: The amount charged for the trade. This is optional.
- Fee Currency: The currency in which the fee was charged. This is optional.
- Description: A description of the trade if any. This is optional.
- Timestamp: The UTC Unix timestamp at which the trade took place. This is a milliseconds timestamp.
A sample generic trades template can be found below:
rotki Generic Trades Template
[Download CSV Example]rotki Generic Events Import
This is for importing generic events. Supported events are "Deposit", "Withdrawal", "Income", "Loss", "Spend" and "Staking". The expected file format is CSV with the following headers and descriptions as a guide:
- Type: The event type. It can be one of
"Deposit","Withdrawal","Income","Loss","Spend"or"Staking". - Location: This is the source of the data. It should be one of rotki's supported locations. If it is not supported, use
"external". - Currency: The currency used during the specified event.
- Amount: The amount of the currency used by the event.
- Fee: The amount charged for the event. This is optional.
- Fee Currency: The currency in which the fee was charged. This is optional.
- Description: A description of the event that was carried out, if any. This is optional.
- Timestamp: The UTC Unix timestamp at which the event took place. This is a milliseconds timestamp.
A sample generic events template can be found below:
rotki Generic Events Template
[Download CSV Example]Supported Locations
A list of supported locations in rotki are "external", "kraken", "poloniex", "bittrex", "binance", "bitmex", "coinbase", "banks", "blockchain", "gemini", "equities", "realestate", "commodities", "cryptocom", "uniswap", "bitstamp", "binanceus", "bitfinex", "bitcoinde", "iconomi", "kucoin", "balancer", "loopring", "ftx", "nexo", "blockfi", "independentreserve", "gitcoin", "sushiswap", "shapeshift", "uphold", "bitpanda", "bisq", "ftxus" and "okx".
Note: In the columns where an asset is expected, you will need to use the identifier that such asset has in rotki; otherwise, the row won't be read.
Note: If at any point, you're confused about the CSV format, feel free to send us a message on Discord.