Contributing as a Developer
Being an open-source project, we welcome contributions in the form of source code. To do that, you will have to work on an issue and open a Pull Request for it.
In order for your Pull Request to be considered, it will need to pass the automated CI tests, and you will also need to sign the CLA (Contributor's License Agreement).
Committing Rules
For an exhaustive guide, read this guide. It's all really good advice. Some rules that you should always follow though are:
- Commits should be just to the point, not too long and not too short.
- Commit titles should not exceed 50 characters.
- Give a description of what the commit does in a short title. If more information is needed, then add a blank line and afterward elaborate with as much information as needed.
- Commits should do one thing; if two commits both do the same thing, that's a good sign they should be combined.
- Never merge master on the branch; always rebase on master. To delete/amend/edit/combine commits, follow this tutorial.
When pushing on a PR, the tags [skip ci] or [ci skip] can be used as part of the commit message to skip the run of all the CI jobs (lint, test, etc.).
Lastly, we encourage using signed commits:
git config commit.gpgsign true
git config --global user.signingkey <KEYID>
For more information about signing commits, check out Verify commit signatures.
Linting / Formatting
Make sure to run make lint before pushing your commit. This runs ruff, mypy, and pylint on the code to make sure that formatting rules and common mistakes are not committed in the code.
You can also bulk apply formatting changes to all files by running make format.
To catch spelling mistakes before pushing, you can install typos. The CI will check for typos, so running it locally can help avoid CI failures:
cargo install typos-cli  # or other installation methods from the docs
typos                   # check for typos
typos -w               # automatically fix typos
If you encounter false positives, add exceptions in _typos.toml:
[default.extend-words]
# Add exceptions for names, technical terms, etc
teh = "teh"    # Example: preserving "teh" as a surname
Where to make changes
- If you want to contribute by fixing a bug, use the bugfixes branch.
- To add new assets, also use the bugfixes branch.
- Any other change can be made against the develop branch.
Our releases work like this:
- We release patches by merging the
bugfixesbranch to master and adding a new tag. - Normal releases are created by merging the
developbranch to master and adding a new tag.
Adding new assets to rotki
To add new assets for rotki, you will have to edit the SQL file in the last update at the assets repository. SQL sentences for insertion differ depending on if we are adding an Ethereum token or other types of assets. More information about each type of asset and columns is available in the readme file.
rotki uses CAIP-19 to uniquely identify assets. So for example, if we wanted to refer to the Uniswap (UNI) ERC-20 token on the Ethereum mainnet chain, the correct identifier would be eip155:1/erc20:0x1f9840a85d5aF5bf1D1762F925BDADdC4201F984.
Once you have finished adding assets, it will be necessary to update the file containing metadata about the update. To do so, run the script:
python tools/populate_infojson.pyThis will update the file info.json. Finally, execute the tests to detect possible errors in the SQL sentences using:
pytest testsIn order to do so, you will need to install the dependencies using uv sync.
Get CoinGecko asset identifier
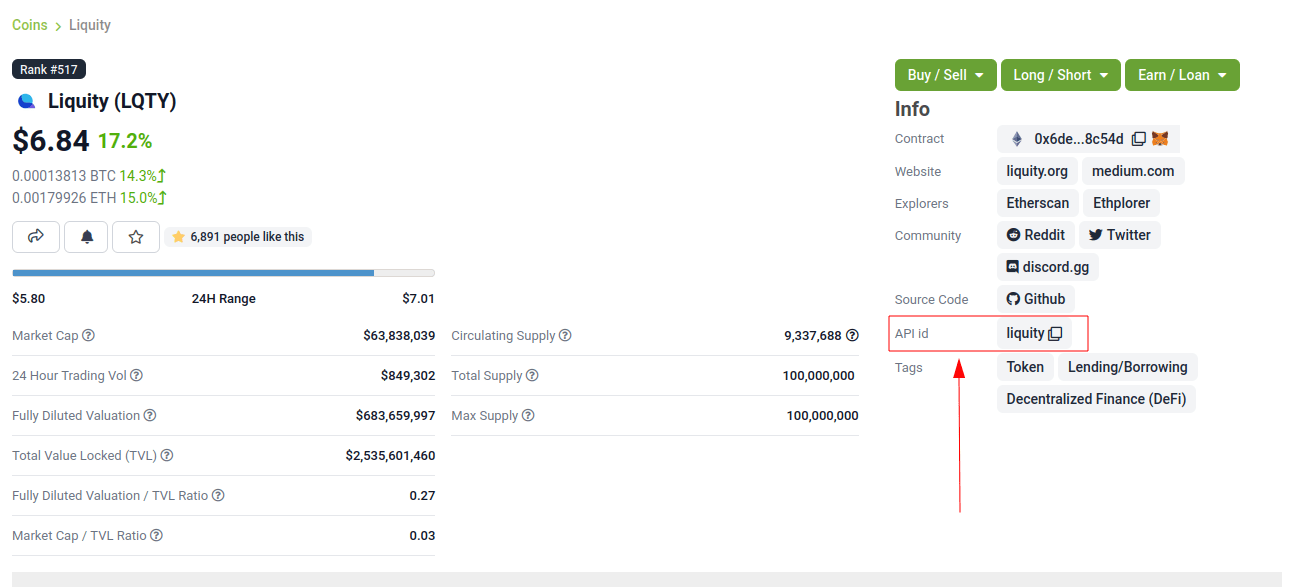
In most cases, the CoinGecko asset identifier matches the URL one, for example "weth" for WETH. However, sometimes it doesn't, for example "sharering" for SHR ("sharetoken" in the URL). Lately, CoinGecko added the API id of the asset to the information provided for the asset.
This identifier mismatch can be detected by running this test:
python pytestgeventwrapper.py -xs rotkehlchen/tests/unit/test_assets.py::test_coingecko_identifiers_are_reachableThe test warns each mismatch suggesting the potential identifier (e.g., Suggestion: id:sharering name:ShareToken symbol:shr). This identifier can be checked via the GET coins by id endpoint on the CoinGecko API explorer.
The test also warns about any asset delisted from CoinGecko. In that case, add the delisted asset identifier to the coins_delisted_from_coingecko list.
Get CryptoCompare asset identifier
One important gotcha is to check for CryptoCompare asset prices. Unfortunately, you need to check the page of each asset in CryptoCompare. For example, for $BASED you would need to check the page and then try to see the API call for USD price to see if it exists. If this returns something like:
{
  "Response": "Error",
  "Message": "There is no data for any of the toSymbols USD .",
  "HasWarning": true,
  "Type": 2,
  "RateLimit": {},
  "Data": {},
  "Warning": "There is no data for the toSymbol/s USD ",
  "ParamWithError": "tsyms"
}
Then that means you have to check the CryptoCompare page and compare directly with the asset they have listed there. Like so and see that it works. Then you need to edit the CryptoCompare mappings in the code to add that special mapping here. If you don't find your asset on CryptoCompare, just put an empty string for the cryptocompare key. Like cryptocompare: "".
Hopefully, this situation with CryptoCompare is temporary and they will remove the need for these special mappings soon.
Helpful commands
- To get the checksummed Ethereum address, you can get it from the Python console using our code simply by doing:
>>> from eth_utils.address import to_checksum_address
>>> to_checksum_address("0x9c78ee466d6cb57a4d01fd887d2b5dfb2d46288f")
'0x9C78EE466D6Cb57A4d01Fd887D2b5dFb2D46288f'
Working with the develop branch
The big changes to the code all happen in the develop branch. Those might include changes to the schema both in the user database and the global database. Errors related to partially migrated databases might manifest as errors in the UI when executing queries or failures to start the app or sign in. For working on develop instead of the normal data rotki directory, we use another in the root path called develop_data.
To avoid losing information, we recommend copying your account from data to develop_data each time you pull new changes in develop, especially if you know that any DB schema changes happened.
WARNING
If your production data in data has syncing with rotki Premium enabled, please ensure that you disable this after copying to develop_data, otherwise there is a strong risk of syncing non-production data back to your production environment, and this could cause problems.
Adding new Centralized Exchanges (CEXes)
All centralized exchanges modules live in a separate python file under here.
As an example of how to add a new CEX you can check the Bitpanda PR.
Add Location
You should add a new value to the location Enum and also make sure that the value is mirrored in the DB's schema as seen here. Add it also in the SUPPORTED_EXCHANGES list here. Finally, don't forget to add it in the latest DB upgrade as seen in the Bitpanda PR linked at the start of this section.
Create exchange module
To add a new CEX you should create a new file with the name of the exchange all lowercase in here.
It should have a class which should be the exact same name as the file but with the first letter capitalized. So if the module name is pinkunicorn.py the class name should be Pinkunicorn.
That class should inherit from the ExchangeInterface and implement all the required methods.
It should have an edit_exchange_credentials() and validate_api_key() to be able to validate and accept new credentials.
It should have a query_balances() to return the current balances of the user in the exchange.
It should have a query_online_trade_history() to query the trade history endpoint of the exchange for a given time range and save them in the database.
It should have a query_online_deposits_withdrawals() to query the deposit/withdrawals history endpoint of the exchange for a given time range and save them in the database.
Optionally it can have a query_online_income_loss_expense to parse any special data from the exchange that can create income/loss items for the user such as staking events.
Add Asset Mappings
Exchanges have assets listed by symbols. This is unfortunately inaccurate and has conflicts since there is no central crypto registry and there are too many crypto assets using the same symbol.
We tackle this by having special mapping such as this one here. So you would add the mapping WORLD_TO_MYNEWEXCHANGE. Then you would create an asset_from_mynewexchange() function like this one for Bittrex.
To find any assets listed in the exchange that are not mapped perfectly you would need to find and call the endpoint of the exchange that queries all assets. Then you need to write a test like this which queries all assets and tries to call the asset_from_bittrex() function. If any asset is not mapped properly a warning should be raised so we the developers figure out a new asset is added and we need to map it.
Add tests for the exchange
You should write tests for all the endpoints of the exchange you implemented. To see what tests and how to write them, check the Bitpanda PR linked at the start of this section.
You will generally need to:
- Touch
rotkehlchen/tests/api/test_exchanges.py::pytest_setup_exchange() - Add a new test module under
rotkehlchen/tests/exchanges/ - Add a new fixture for the exchange at
rotkehlchen/tests/fixtures/exchanges/mynewexchange.pyand expose it inrotkehlchen/tests/fixtures/__init__.py
Adding new Ethereum modules
This guide explains how to add a new Ethereum module into rotki and its corresponding transaction decoder and accountant.
Add new module directory
Each Ethereum module lives in this directory. To add a new module you should make sure the name is unique and create a new directory underneath.
The directory should contain the following structure:
  |
  |--- __init__.py
  |--- decoder.py
  |--- constants.py
  |--- accountant.py
Almost all of the above are optional.
The decoder
As an example decoder, we can look at MakerDAO.
It needs to contain a class that inherits from the DecoderInterface and is named ModulenameDecoder.
Note: If your new decoder decodes an airdrop's claiming event and this airdrop is present in the data repo airdrop index with has_decoder as false, please update that also.
Counterparties
It needs to implement a method called counterparties() which returns a list of counterparties that can be associated with the transactions of this module. Most of the time these are protocol names like uniswap-v1, makerdao_dsr, etc.
These are defined in the constants.py file.
Mappings and rules
The addresses_to_decoders() method maps any contract addresses that are identified in the transaction with the specific decoding function that can decode it. This is optional.
The decoding_rules() define any functions that should simply be used for all decoding so long as this module is active. This is optional.
The enricher_rules() define any functions that would be used as long as this module is active to analyze already existing decoded events and enrich them with extra information we can decode thanks to this module. This is optional.
Decoding explained
In very simple terms, the way the decoding works is that we go through all the transactions of the user and we apply all decoders to each transaction event that touches a tracked address. The first decoder that matches creates a decoded event.
The event creation consists of creating a HistoryBaseEntry. These are the most basic form of events in rotki and are used everywhere. The fields as far as decoded transactions are concerned are explained below:
event_identifieris always the transaction hash. This identifies history events in the same transaction.sequence_indexis the order of the event in the transaction. Many times this is the log index, but decoders tend to play with this to make events appear in a specific way.assetis the asset involved in the event.balanceis the balance of the involved asset.timestampis the Unix timestamp in milliseconds.locationis the location. Almost alwaysLocation.BLOCKCHAINunless we got a specific location for the protocol of the transaction.location_labelis the initiator of the transaction.notesis the human-readable description to be seen by the user for the transaction.event_typeis the main type of the event. (see next section)event_subtypeis the subtype of the event. (see next section)counterpartyis the counterparty/target of the transaction. For transactions that interact with protocols, we tend to use theCPT_XXXconstants here.
Event type/subtype and counterparty
Each combination of event type and subtype and counterparty creates a new unique event type. This is important as they are all treated differently in many parts of rotki, including the accounting. But most importantly this is what determines how they appear in the UI!
The mapping of these HistoryEvents types, subtypes, and categories is done in rotkehlchen/accounting/constants.py.
The Accountant
As an example accountant module, we can look at MakerDAO.
The accountant.py is optional but if it exists should also be under the main directory. It should contain a class named ModuleNameAccountant and it should inherit the ModuleAccountantInterface.
What this class does is map all the different decoded events to how they should be processed for accounting.
These accountants are all loaded in during PnL reporting.
Each accountant should implement the reset() method to reset its internal state between runs.
Event Settings mapping
Each accountant should implement the event_settings() method. That is a mapping between each unique decoded event type, identified by get_event_type_identifier() and its TxEventSettings().
So essentially determining whether:
taxable: It's taxablecount_entire_amount_spend: If it's a spending event if the entire amount should be counted
as a spend which means an expense. Negative PnL.
count_cost_basis_pnl: If true then we also count any profit/loss the asset may have had compared to when it was acquired.take: The number of events to take for processing together. This is useful for swaps, to identify we need to process multiple events together.method: Either anacquisitionor aspend.multitake_treatment: Optional. Iftakeis not1, then this defines how we treat it. It's always a swap for now, soTxMultitakeTreatment.accountant_cb: Optional. A callback to a method of the specific module's accountant that will execute some extra module-specific pnl processing logic. The MakerDAO accountant linked above has some examples for this.
Multiple submodules
The modules system is hierarchical and one module may contain multiple submodules. For example, Uniswap having both v1 and v3 each in their own subdirectories as seen here.
Add a new language or translation
Add new language
The translation files are located here. They are saved with the format {language_code}.json. You can see the list here. If you want to add a new language, you need to create a new language file with that format, and then fill it.
You also need to update the frontend mapping that is defined at this enum, and these entries. The countries field will be used to show the country's flag on the app. You can see the list here.
Add or edit a translation
rotki does translation using Vue i18n.
rotki's main language is English. The language file for it is here. To fill in the translation for another language, you should pay attention to the following things:
The
JSONstructure from theEnglishlanguage file is absolute, meaning you can't change the JSON structure (the keys), because this is how rotki reads which value to use. So for translations of other languages, please follow the same structure as theEnglishlanguage JSON file. For example:- en.json
json{ "exchange_balances": { "add_exchange": "Add exchange", "click_here": "Click here" } }- es.json
json{ "exchange_balances": { "add_exchange": "Añadir intercambio", "click_here": "Haga clic aquí" } }You may notice that there are some words that are wrapped inside curly brackets, for example the word
lengthin the sentenceUse total from {length} asset(s) value. This is how rotki inserts a variable inside a sentence. You must keep this variable name, when translating to a different language. What you can do though is to reposition the variable inside the sentence. For example:- en.json
json{ "total": { "use_calculated_asset": "Use total from {length} asset(s) value: " } }- es.json
json{ "total": { "use_calculated_asset": "Utilice el valor total de {length} activos: " } }For missing keys from other language files, by default it will use the value of the master file which is
English.
Add a new Airdrop
To add a new airdrop in the DeFi/Airdrops section, go to the data repo here.
- Add the entry in
airdrops/index_v2.jsonunder theairdropsfield. - If the token is new and is not expected to exist in the userDB and globalDB then
new_asset_datashould be added in the index. - If the asset's icon is not present in the
rotkirepo, it should be added in theairdrops/iconsdirectory, with its path provided in its airdrop's index entry. If it's present, simply mention its name in theiconfield. - If no decoder is present to decode the claiming event of this airdrop, add a
has_decoderfield in the entry with the value asfalse.
Adding Token Airdrops with a CSV
- The CSV's header should have the first column as
addressand the second column asamount. - The amounts should be normalized according to their decimals.
- Create a Parquet file from the CSV using
python scripts/csv_to_parquet.py <path_to_csv>and remove the CSV. - Move the Parquet file in the
airdrops/directory, with its path provided in its index entry.
Adding Token Airdrops with an API
- Add the API URL under the
api_urlfield, with an{address}placeholder. This{address}will be replaced by the user's address at the time of checking the eligibility. - Add the
amount_pathin the form of a string with/separated fields. The returned JSON from the above API will be parsed using this path by reading each separated field from left to right, down the JSON. At the end, it should reach the amount of tokens, for which the user's address is eligible.